Keep your ankles relaxed to allow the blood from the legs to flow to the upper body.


| Candle | Hands on the small of your back, with your fingers toward your spine. Start
by coming up on your shoulders with your knees bent. Tuck your hands under your buttocks, with your fingers pointing toward your spine. Then,
as you exhale, gently raise your body by letting your hands walk down your back and push
you into position as you straighten your legs. Keep your ankles relaxed to allow the blood from the legs to flow to the upper body. |
|
1 - 3 Minutes |
| Plough | This stretches your entire spine, particularly your cervical vertebrae and shoulders plus all the posterior muscles from your head to your toes. Start with the knees bent, later straighten your legs. Put your toes on the floor, push your heels away from you. Contract your abdominal muscles. | |
2 Minutes |
| Fish | Tuck your hands in underneath your buttocks. Arched your spine, tilt your head so that your crown rests on the ground. Use the back muscles to lift you up as much as possible. Try not to use the arms as much to lift. | 1 Minute | |
| Forward Bend | Extend your heels away from you by pulling your feet toward your chins. Keep your legs straight and tuck your chin against your chest. Then slowly bend forward with your arms out-stretched, inching your way toward your toes. Use your abdominal muscles to pull you forward. | |
2 Minutes |
| Cobra | Place your hands flat on the floor so that they are directly underneath your shoulders. Next lift your trunk off the floor using the muscles of the back. Look up to the ceiling. Push up with the hands as little as possible. | |
1 Minute |
| Locust | Chin on the ground, then move it forward as much as you can, so that your throat lies almost flat. Hands under your body, and clasp them together. Contract the lower back muscles to lift straightened legs into the air. | |
1 Minute |
| Bow | Bend your knees and grab your ankles; not the top of your feet or your toes. Keep your feet relaxed. Inhale, raising your head, chest, and legs. Lift straight up, not toward the head. Start for 10 seconds; work toward 30 seconds. | |
1/2 Minute |
| Spinal Twist | Cross your left leg, "Indian Style". Bend your right leg and cross your right foot over your left leg and place it on the floor, outside of your left knee. Put your right hand flat on the floor behind your back. Bring your left arm outside your bent, right knee and try to grasp your right ankle. Twist using your abdominal muscles rather than your arms. | |
1 minute |
| Headstand | Omit unless you have been trained by a teacher. | 1 - 10 Minutes |
![]()
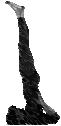
The Candle (Shoulderstand)
Definition: An inverted pose, with your body resting on your shoulders.
This pose strengthens your entire body; it has many of the benefits of the Headstand, but here the circulation is directed to your thyroid gland instead of the head.
Objective: To stretch your cervical and thoracic regions and to bring
blood from the legs to the thoracic regions.
Step 1 - Legs in the air
Before beginning the Shoulderstand, make sure that there is enough room behind you. You must be able to stretch your arms out behind your head and have at least 1 foot between your fingertips and any obstructions. Lie flat on your back, with your feet together. Inhale while bending your knees up to a right angle.
Step 2 - Moving Up
Tuck your hands under your buttocks, with your fingers pointing toward your spine. Then, as you exhale, gently raise your body by letting your hands walk down your back and push you into position.
Step 3 - In Balance
Continue to move your hands up your back until you rest on your shoulders. Breathe normally, and keep your legs straight. Hold for 30 seconds; as the pose becomes easier, increase the time to 3 minutes. To come down, drop your feet halfway to the floor behind your head. Put your hands on the floor. Unroll your body vertebra by vertebra to the floor. Hand position: Put your hands on the small of your back, with your fingers toward your spine.
Variation
Inhale with your hands on your back. Exhale and bring one foot to the floor behind your head. Inhale. Raise your leg. Swap sides.
![]()
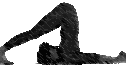
The Plough Pose
Step 1 - Legs Over
In the Plough, your body is bent forward; this stretches your entire spine, particularly your cervical vertebrae and shoulders. Come up into a Shoulderstand, and inhale deeply. Exhale while lowering your feet to the floor behind your head. You may need to keep your legs bent at first.
Step 2 - Legs Down
Rest your toes on the floor and press your heels away from you, then lay your arms down flat. Hold for 30 seconds at first, but aim to build up to 2 minutes. If you cannot lower your feet all the way, keep your hands on your back for support. To come out, lift your feet off the floor, bend at the knees and slowly roll down. Relax in the Corpse.
Plough Variation
You may try this variation if you are supple enough. Once in the Plough, lower your knees to the floor by your ears. Hook your arms over your legs. To come out, straighten your knees, then roll down as described above.
Objective: To stretch the entire posterior body from head to toes. If your hamstrings are short and tight, you may feel this stretch behind the knees and backs of the legs.
![]()
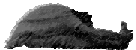
The Fish
Definition: Lying on your back and arching your chest
The fish is the stretch that counters the Shoulderstand and Plough, and so follows them in this session. The name of the posture derives from the fact that if you adopt the position in water, you will float quite easily. The position does wonders for your respiratory systems. When you assume this position, your chest is stretched open and your bronchial tubes are widened to promote easier breathing. In time your ribcage will expand, and this will also encourage you to breathe more deeply. By lifting your chest and tucking your arms underneath your body, you will combat postural defects such as rounded shoulders and the cervical region of your spine, thus releasing pressure on your nerves. Try to hold the pose for half of the time that you spent in the Shoulderstand, in order to equalize the stretching effects on your spine and muscles.
Objective: To ease tension and improve spinal flexibility; to stretch the chest and strengthen the back.
Step 1 - On your back
Assume the Corpse Pose and, when you are ready, begin to come into the fish. Stay flat
on your back, and bring your feet together. With your arms straight by your sides, lay
your palms on the floor, then tuck your hands in underneath your buttocks.
Starting Pose: Prepare yourself for this position by relaxing in the Corpse Pose for as
long as you need.
Step 2 - Head Back
Having arched your spine, tilt your head so that your crown rests on the mat. Hold for 30 seconds. To come out of the Fish, slide your head back and then lower your chest. To finish, relax by lying in the Corpse.
Chest Lift: Press your elbows down on the floor, inhale, and arch your chest upward as far as you can.
![]()
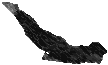
Forward Bend
Definition: Stretching your spine forward
The Forward Bend looks, and is, simple - provided you relax into the position, rather than forcing yourself into it. The pose is one of the most powerful and important positions, helping to ease the spinal compression caused by standing upright. Its practice contributes greatly toward keeping your back supple, your joints mobile, your nervous system invigorated, and your internal organs toned.
Objective: To stretch the back of your body
Starting
Inhale, tuck your chin to your chest. pull your feet back toward you,
extending your heels. Stretch your spine up and lean forward, bending one vertebra
at a time, starting with the top of your neck. Inch your hands toward your toes. Keep your
legs straight. Exhale
into the pose; feel your body stretch. Hold for 30 seconds, then inch your way
farther toward your toes again. Use your abdominal muscles to pull yourself forward. Make sure your
feet are pointed back toward your knees and your chin is tucked.
Clasp Position: If you are not able to reach your toes, clasp your ankles, shins, or
knees, to hold the position comfortably.
![]()
The Cobra
Definition: Coiling your upper body up and back.
Step 1 - Face Down
Lie on your front. When you are fully relaxed, begin to come into the cobra. Still lying on your front, place your hands flat on the floor so that they are directly underneath your shoulders. Next lift your head up a little and bend your neck, then lower your forehead to the ground.
Step 2 - Roll Up
Tighten the muscles at your tailbone and the front of your thighs and keep them active throughout the pose. Without using the strength of your arms, use your back muscles to take your upper body off the floor, vertebra by vertebra. First your head, then your shoulders and chest come off of the floor. Next, engage the strength of your arms and traction your hands toward the wall behind you as more of your upper body comes off of the floor. Keep your elbows bent and hugging the sides of your body. Feel your abdomen stretching forward on the floor and your spine elongating, from the top of the spine at the back of the neck to the tailbone. Look up. Keep your shoulders low. Only an inch or two of additional stretch is needed by pressing up with the arms.
Step 3 - Hold
Work to hold this pose for 60 seconds.
If this pose bothers your back, either take your hands forward more on the floor or place your elbows on the floor, shoulder-distance apart and a little ahead of your shoulders. Soften your gaze; quiet your hearing; relax your jaw. Breathe evenly and comfortably through your nose. To come out of the pose, continue to traction your hands toward the wall behind you as your body, vertebra by vertebra, comes to the floor, ending with your forehead on the floor.
![]()
The Locust
Definition: Lying face down with lifted legs.
Step 1 - Face Down
Lie on your front. Rest your chin on the ground, then move it forward as much as you can, so that your throat lies almost flat. Put your arms by your sides, then push your hands under your body, and make them into fists or clasp them together. Bring your elbows as close together as possible.
Step 2 - Half locust
Inhale as you lift one leg. Hold this position for at least 10 seconds, then exhale
while lowering your leg and repeat the pose with your other leg. Practice it 3 times on
each side.
Chin position: The further forward you push your chin, the more your spine can stretch and
the more you will gain from this position.
Step 3 - Full Locust
Lie with your chin out, as in the Half Locust, then take 3 deep breaths. On the third, lift both legs off the ground. They may not come up far at first, but with practice you may be able to lift them much higher. Hold for as long as you can, then lower your feet. Work to hold this pose for 60 seconds.
Up and Up: With practice, you will be able to raise your legs higher. Eventually, you may even be able to lift your body vertically.
![]()
The Bow
Definition: Balancing on your abdomen, in the shape of a bow..
The Bow works all parts of your back simultaneously. In this position, your head, chest, and legs are lifted, while your body rests on your abdomen. The pose is so named because as you hold it, your body is bent back like a bow and your arms are held straight and taut like a bowstring. Initially, you may wish to attempt only the first 3 steps, moving on to the Rocking Bow when you have become more confident.
Frontal Corpse
Before and after all positions you must relax for as long as necessary. The position
that you adopt for relaxing between back bends is a variation on the Corpse Pose, in which
you lie on your front. Like all Corpse variations, this pose prepares you mentally and
physically for performing any position.
Head on hands: Your hands make a pillow on which
you can rest your head as you relax in this position.
Feet: Position your feet with your
big toes together; let your heels and ankles fall gently out to either side.
Step 1 - Catch Hold
To begin, lie on your front with your forehead on the ground. Now bend your knees and catch hold of your ankles. Make sure that you do grasp your ankles rather than the top of your feet or your toes. Keep your feet relaxed.
Step 2 - Lift Up
Inhale as you raise your head, chest, and legs. Attempt to straighten your knees. This pushes your feet toward the ceiling. Hold for 10 seconds, aiming to increase to 30. Breathe as you hold the pose. Exhale, and lower your body.
Rocking Bow
For this exercise, come into the Bow, arching as high as you can. Keep your head back
and gently rock, using your breath to propel your body. Exhale as you rock forward, and
inhale as you rock back. Do not forget to relax in the Corpse Pose on your front after you
have completed this movement. Grip: Hold your ankles firmly as you rock.
![]()
Spinal Twisting
Definition: A lateral stretch for your entire spine
After bending forward and back, your spine requires a lateral twist to retain its mobility. This ability to twist is often the first type of flexibility to be lost. During the Spiral Twists your vertebrae are mobilized; the exercises also allow more nourishment to reach the roots of the spinal nerves and the sympathetic nervous system.
Objective: To maintain sideways mobility in your spine
Step 1 - Legs Bent
Sit up on your heels. Drop your buttocks to the floor, to the left of your legs.
Step 2 - Leg Position
Bend your right leg. Cross your right foot over your left leg, and place it on the
floor by the outside of your left knee. Position yourself so that both "sit
bones" are on the floor.
Keeping your arm straight, put your right hand
flat on the floor behind your back. Raise your
left arm straight up.
Step 3 - The Twist
Use your abdominal muscles to twist to the right as you lower your left arm, bringing it outside your bent knee. Grasp your right ankle if you can. Remember to keep both cheeks on the floor and the spine straight. Hold for at least 60 seconds. Reverse and twist the other way.
![]()
The Headstand
Step 1 - Arms & Hands
Sit up on your heels, then catch hold of both your elbows with the opposite hands. Lean forward and lay your forearms on the ground, directly beneath your shoulders. Let go of your elbows, and clasp your hands together.
Step 2 - Head Down
With your arms in the tripod position, above right, lower your head so that the top of your skull touches the ground and the back of it is cradled in your hands. Do not make any abrupt movements. Take the next steps slowly.
Step 3 - On Your Toes
From the crouched position with your head resting in your hands, straighten your knees and push your hips up above your head. Then, keeping your legs straight, stretch up high on your toes.
Step 4 - Half Headstand
Now bend your knees, bringing them to your chest. Arch your back slightly, as you do when standing up; this will enable you to balance your body in this position. Do not proceed unless you can hold this position for at least 30 seconds without feeling any discomfort.
Step 5 - Knees Up
With your knees still bent, start to straighten your hips. Slowly and carefully, raise your knees until they are pointing straight up toward the ceiling.
Step 6 - All the Way
Straighten you knees and lift your feet up toward the ceiling. Support your weight by
bracing your elbows against the ground. At first, hold the Headstand for 30 seconds; as
you become more skilled at adopting this pose, gradually increase the time to 3 minutes.
Always come down before you start to feel tired. Leave the pose slowly and under control
(see below). Head in Hands:
Rest the back of your head against your hands. Relax, breathing through your nose.
Coming out
You should leave this position as carefully as you entered it. Do not move jerkily or
quickly, or you may lose control and fall.